Jupyter notebook 버전 컨트롤과 diff 확인, 어떻게 해야할까?
Jupyter을 이용해 코딩을 할 때 git을 이용한 version control이 용이하지 않을 때가 있다. 간단한 figure 하나만 바뀌어도 아래와 같이 가시성이 떨어지는 diff message가 나온다.
@@ -27,27 +27,27 @@
     "import matplotlib.pyplot as plt\n",
     "import matplotlib.image as mpimg\n",
     "for x in range(10):\n",
-    "    print(x ** 2)"
+    "    print(x ** 3)"
    ]
   },
   {
    "cell_type": "code",
-   "execution_count": 4,
+   "execution_count": 5,
    "metadata": {},
    "outputs": [
     {
      "data": {
       "text/plain": [
-       "<matplotlib.image.AxesImage at 0x208fe7a5c88>"
+       "<matplotlib.image.AxesImage at 0x2089002d2e8>"
       ]
      },
-     "execution_count": 4,
+     "execution_count": 5,
      "metadata": {},
      "output_type": "execute_result"
     },
     {
      "data": {
-      "image/png": "iVBORw0KGgoAAAANSUhEUgAAAXcAAADTCAYAAAB6OlOyAAAAOXRFWHRTb2Z0d2FyZQBNYXRwbG90bGliIHZlcnNpb24zLjMuMywgaHR0cHM6Ly9tYXRwbG90bGliLm9yZy/Il7ecAAAACXBIWXMAAAsTAAALEwEAmpwYAAA0oklEQVR4nO3deXxU1fn48c8zyUz2FQIEEtYgiwIKERFBUQSsSwUVvrYW+boU/blhrVZQq3VrcStqXSq4gS1W/YqIiiggrQuILLIjEFlMwhJCFgJZJ/P8/sidNCBLtpk7mTnv1yuvzF1yzzlzM889c+6554iqYhiGYQQXh90ZMAzDMJqfCe6GYRhByAR3wzCMIGSCu2EYRhAywd0wDCMImeBuGIYRhHwS3EXkIhHZIiJZIjLZF2kYhmEYxyfN3c9dRMKArcAIIAdYAfxKVTc1a0KGYRjGcfmi5j4QyFLV7apaCfwLuNwH6RiGYRjH4Yvg3gHIrrOcY60zDMMw/CTcroRFZCIwESAmJmZAz5497cqKYRhGi7Rq1ap8VU051jZfBPdcIL3Ocpq17giqOh2YDpCZmakrV670QVYMwzCCl4jsOt42XzTLrAC6i0gXEXEBVwPzfJCOYRiGcRzNXnNXVbeI3AZ8BoQBr6vqxuZOxzAMwzg+n7S5q
.....
이렇게 jupyter notebook의 diff 확인의 어려움을 극복하는 몇가지 방법을 소개한다.
1. commit하기 전 jupyter notebook의 output들을 모두 정리
output만 없애고 commit하면 상대적으로 깔끔하 diff를 볼 수 있다. 예를 들어 graph figure, img output이 변경되면 ipynb의 diff에 binary 변경점이 그대로 나오는데, 이를 없애고 커밋하면 긴 binary diff를 보지 않아도 된다. 결과물을 저장할 수 없는 것이 단점.
2. ipynb file을 python code로 변환해 저장
.ipynb을 .py로 변환할 수 있다. 방법1과 같이 결과물을 저장할 수 없는 것이 단점이다.
jupyter nbconvert something.ipynb --to="python"
3. nbdime 사용
nbime: Jupyter Notebook Diff and Merge tool. https://github.com/jupyter/nbdime
변형된 형태의 git diff라고 생각하면 된다. nbdime을 이용하면 Jupyter 파일들의 diff를 직관적으로 확인할 수 있다.
- command line에서 diff 확인
nbdiff commit1 commit2 filepath
결과물:
## inserted before /cells/1:
+  code cell:
+    execution_count: 5
+    source:
+      img = mpimg.imread("https://cdn.nextjournal.com/data/QmcYdnhqQJrLdKxnDQ2iAwvJbomW8vL1LFmvVficpTrEic?filename=git-transit.png&content-type=image/png")
+      plt.imshow(img)
+    outputs:
+      output 0:
+        output_type: execute_result
+        execution_count: 5
+        data:
+          text/plain: <matplotlib.image.AxesImage at 0x2089002d2e8>
+      output 1:
+        output_type: display_data
+        data:
+          image/png: iVBORw0K...<snip base64, md5=aaad22f9e6b12552...>
+          text/plain: <Figure size 432x288 with 1 Axes>
+        metadata (unknown keys):
+          needs_background: light

## deleted /cells/1:
-  code cell:
-    execution_count: 4
-    source:
-      img = mpimg.imread("https://github.githubassets.com/images/modules/open_graph/github-mark.png")
-      plt.imshow(img)
-    outputs:
-      output 0:
-        output_type: execute_result
-        execution_count: 4
-        data:
-          text/plain: <matplotlib.image.AxesImage at 0x208fe7a5c88>
-      output 1:
-        output_type: display_data
-        data:
-          image/png: iVBORw0K...<snip base64, md5=2cbb1d38259c0c72...>
-          text/plain: <Figure size 432x288 with 1 Axes>
-        metadata (unknown keys):
-          needs_background: light
- web view 방식으로 diff 확인하기
nbdiff-web commit1 commit2 filepath
결과물:
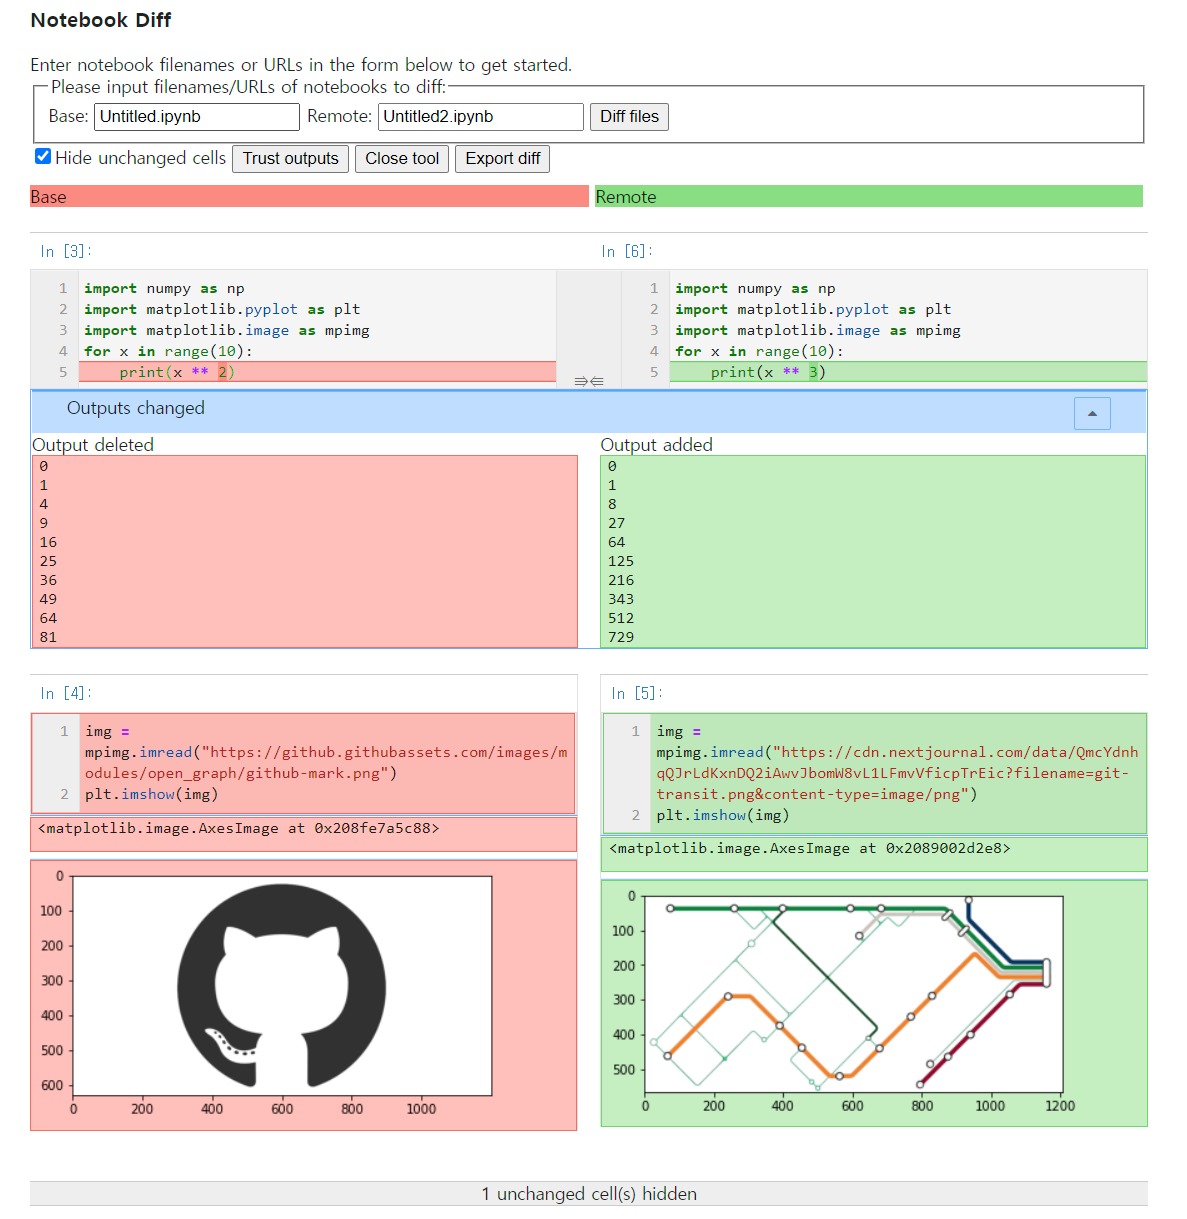
- git에서 default로 nbdime 사용하기
아래 명령어를 사용하면, git diff 명령어에서 ipynb 파일만 nbdiff로 볼 수 있다.
nbdime config-git --enable --global
reference
https://nextjournal.com/schmudde/how-to-version-control-jupyter